by
by Absolutely! Here’s a detailed guide on how to make a chic crocheted cord bag with a bump pattern — a stylish and sturdy DIY accessory perfect for everyday use or gifting. This tutorial will use a bump stitch pattern to give the bag a modern, textured look, and a cord yarn (such as polyester cord, T-shirt yarn, or macramé rope) for durability and structure.
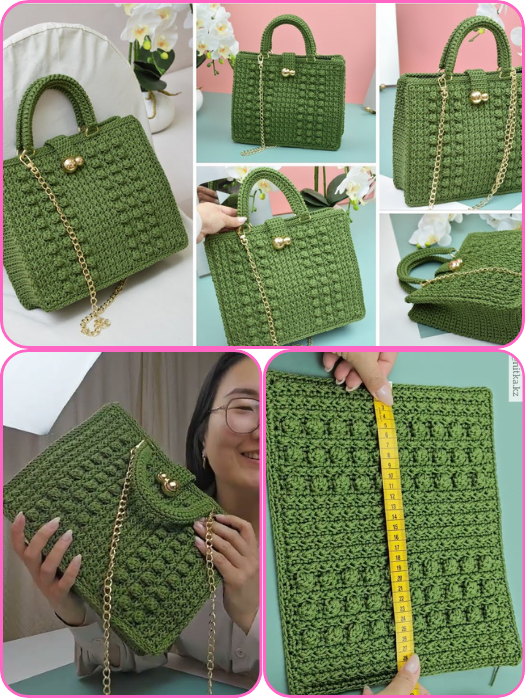
🧶 DIY Chic Crocheted Cord Bag (Bump Pattern)
✨ Materials Needed:
- Crochet hook: Size 6.0 mm – 8.0 mm (check your cord thickness; choose a hook that suits your cord snugly but allows smooth movement)
- Cord yarn: Approx. 100–150 meters (4–6 mm thickness) – polyester cord, T-shirt yarn, or cotton cord
- Stitch marker (optional)
- Scissors
- Tapestry needle
- Magnetic snap or zipper (optional for closure)
- Bag handles or D-rings (optional if you want shoulder straps)
🧵 Pattern Overview
This bag is made in two flat panels, seamed together, then edged and finished with a simple handle or detachable strap. The bump pattern creates a 3D texture, adding chic detail and sturdiness.
🧩 Step-by-Step Instructions
🔹 Step 1: Make the Base (Bottom Panel)
We’ll create a rectangular base in single crochet.
Foundation Row
- Ch 21 (or adjust width to your preference).
- Row 1: SC in 2nd ch from hook and across. (20 SC)
- Ch 1, turn.
Rows 2–6:
- SC across in each stitch. Ch 1, turn.
This makes a base about 8” wide. You can go larger or smaller.
🔹 Step 2: Begin the Bump Pattern (Body of the Bag)
The bump pattern is often a combination of front post double crochet (FPDC) and back post double crochet (BPDC) or popcorn stitches for more raised texture. Here’s a bump-style variation using the popcorn stitch:
Row 7 (Start Bump Pattern):
- SC in first st, popcorn stitch in next st, SC in next st, repeat from * to end. Ch 1, turn.
Popcorn Stitch (PC):
- Work 5 DC in the same stitch, remove hook, insert into the first DC, pull working loop through and ch 1 to secure.
Row 8 (Flat Row):
- SC in each stitch across to even out the bumps. Ch 1, turn.
Repeat Rows 7 & 8 until your desired height (about 25–30 rows depending on your yarn and bag size).
Make two identical panels.
🔹 Step 3: Join the Panels
- Place the two panels together, right sides facing out.
- Using SC or slip stitch, seam the sides and bottom (3 sides) of the bag.
- Turn the bag right side out.
Optional: You can add a lining here if desired using fabric and basic sewing skills.
🔹 Step 4: Create the Bag Opening (Top Border)
- Join yarn to the top edge, and SC evenly around the top edge.
- You can also do one or two rounds of reverse SC (crab stitch) for a decorative, sturdy edge.

🔹 Step 5: Add Handles
Option 1: Crochet Handles
- Ch 50 (or desired strap length), then attach with SC to both ends inside the bag.
- SC over the chain to thicken the strap, then sew or SC onto the bag securely.
Option 2: Use Leather/Pre-made Handles
- Use D-rings or bag clips and sew them to the inside top edges.
- Attach purchased handles for a polished finish.
🔹 Step 6: Add Closure (Optional)
- Attach a magnetic snap or sew in a zipper along the top if you want a secure closure.
🎨 Customization Ideas
- Use two-tone colors: One color for the body, another for the bump rows.
- Add tassels or pom-poms on the side for flair.
- Try a flap with a button closure for a satchel style.
🧺 Care Instructions
- If using polyester cord: Wipe clean or hand wash gently with cold water.
- Avoid machine wash to maintain shape.
- Lay flat to dry.
Watch video: