 by
by Absolutely! Crocheting a shoulder bag is a fantastic project for beginners. It’s relatively simple, highly customizable, and results in a practical item you can use or gift. Here’s a detailed guide on how to make an easy crochet shoulder bag:
How to Make an Easy Crochet Shoulder Bag for Beginners
This guide focuses on a simple rectangular bag using basic stitches, perfect for those just starting out.
I. Understanding the Basics
Before you start, let’s cover some fundamentals:
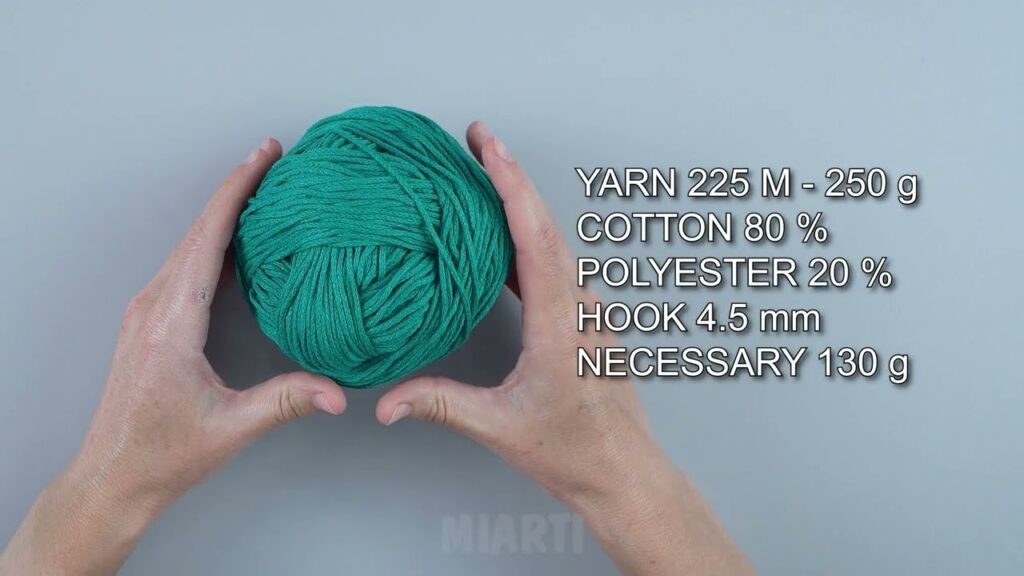
- Yarn Weight: For a sturdy bag, I recommend a worsted weight (medium #4) or a bulky weight (chunky #5) yarn. Thicker yarn works up faster and creates a more robust bag.
- Hook Size: The hook size will depend on your yarn. Always check the yarn label for the recommended hook size. As a general rule:
- Worsted Weight: 5.0mm (H) – 6.0mm (J) hook
- Bulky Weight: 6.0mm (J) – 8.0mm (L) hook
- Gauge: For a bag, exact gauge isn’t as critical as it is for garments, but aim for a fabric that isn’t too loose (as items might fall out) or too stiff.
- Basic Stitches You’ll Use:
- Chain (ch): The foundation of most crochet projects.
- Single Crochet (sc): A very common and sturdy stitch.
- Half Double Crochet (hdc): A slightly taller stitch than sc, providing a bit more drape.
- Slip Stitch (sl st): Used to join stitches or finish off.
II. Materials You’ll Need
- Yarn: Approximately 200-300 yards of worsted or bulky weight yarn. Choose a durable fiber like acrylic, cotton, or a blend.
- Crochet Hook: Matching your yarn weight (see above).
- Yarn Needle (Tapestry Needle): For weaving in ends.
- Scissors: For cutting yarn.
- Stitch Markers (Optional but Recommended): Helpful for marking the beginning of rounds or specific stitches.
- Fabric for Lining (Optional but Recommended): To make your bag more durable and prevent items from poking through. About 1/2 yard of cotton fabric.
- Sewing Machine or Needle and Thread (for lining): If you choose to add a lining.
- Magnetic Snap, Button, or Zipper (Optional): For a closure.
III. Choosing Your Design and Dimensions
For a beginner, a simple rectangular bag is easiest.
- Bag Width: Decide how wide you want your bag to be. A good starting point is 10-12 inches (25-30 cm).
- Bag Height: How tall do you want it? 10-12 inches (25-30 cm) is also a good general height.
- Strap Length: This is crucial. Measure a bag you like or drape a measuring tape over your shoulder to determine your preferred strap length. Around 40-50 inches (100-125 cm) is common for a shoulder bag.
IV. Let’s Get Crocheting! (Using Single Crochet)
This pattern uses single crochet for a sturdy fabric. You’ll essentially be crocheting a long rectangle and folding it in half to form the bag.
Abbreviations:
- ch = chain
- sc = single crochet
- st(s) = stitch(es)
- sl st = slip stitch
- FO = Fasten Off
Pattern:
Part 1: The Bag Body (Rectangular Panel)
- Foundation Chain:
- Make a slip knot and put it on your hook.
- Chain (ch) enough stitches to reach your desired bag width. For a 10-inch wide bag with worsted weight yarn, this might be around 30-35 chains. Remember, your first row of single crochet will be worked into the second chain from the hook, so your actual stitch count will be one less than your chain count.
- Tip: Don’t chain too tightly, or your first row will be difficult to work.
- Row 1:
- Insert your hook into the second chain from the hook.
- Yarn over and pull up a loop (2 loops on hook).
- Yarn over and pull through both loops (this is one single crochet).
- Make one single crochet (sc) in each chain across the row.
- Chain 1 (ch 1) and turn your work. (The ch 1 does not count as a stitch; it just gives you height for the next row).
- Row 2 and Beyond:
- Make one single crochet (sc) in the first stitch and in each stitch across the row.
- Chain 1 (ch 1) and turn your work.
- Repeat Row 2 until your rectangle is twice your desired bag height. For a 10-inch tall bag, you’ll crochet until the rectangle measures 20 inches in length.
- FO (Fasten Off) when you reach the desired length, leaving a long tail (about 12-18 inches) for seaming.
Part 2: Assembling the Bag Body
- Fold: Lay your rectangular panel flat. Fold it in half, bringing the two shorter ends together. This will form the body of your bag.
- Seam the Sides:
- Using your yarn needle and the long tail you left, stitch up one side seam of the bag. You can use a whip stitch or a mattress stitch (which creates a nearly invisible seam). Work through both loops of the stitches on each side for a strong seam.
- Once one side is seamed, reattach your yarn (or use a new piece) to the bottom corner of the other side and seam it up as well.
- Weave in any remaining ends securely.
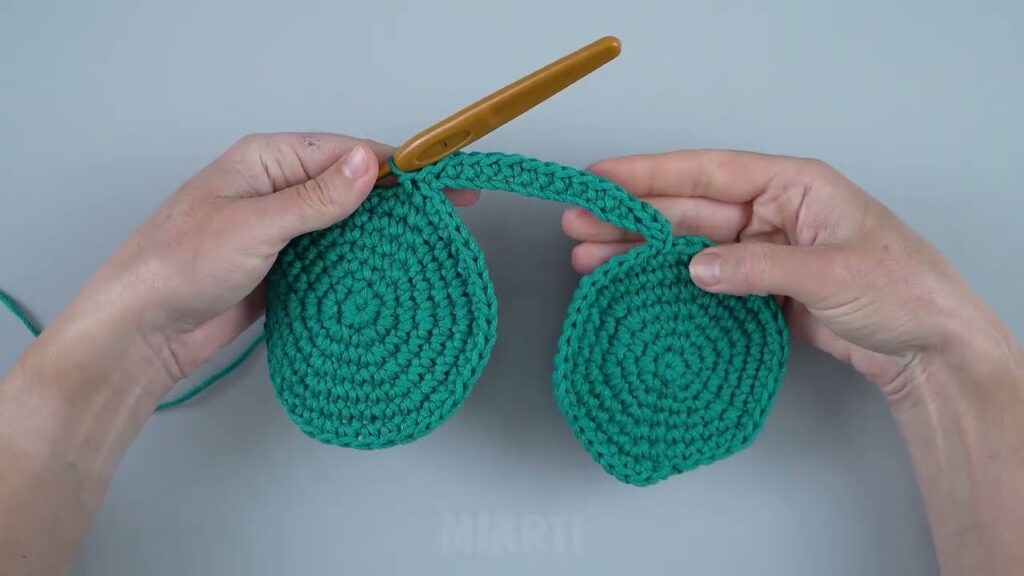
Part 3: The Bag Strap
You can make your strap separately and attach it, or work it directly onto the bag. Making it separately is often easier for beginners.
- Foundation Chain:
- Make a slip knot.
- Chain (ch) enough stitches to reach your desired strap length (e.g., 100-125 chains). Make sure it’s long enough to go over your shoulder comfortably.
- Row 1:
- Single crochet (sc) in the second chain from the hook and in each chain across.
- Chain 1 (ch 1) and turn.
- Row 2 and Beyond:
- Single crochet (sc) in each stitch across the row.
- Chain 1 (ch 1) and turn.
- Repeat Row 2 for 2-4 more rows, depending on how wide you want your strap to be. A wider strap is generally more comfortable.
- FO (Fasten Off), leaving long tails for attaching to the bag.
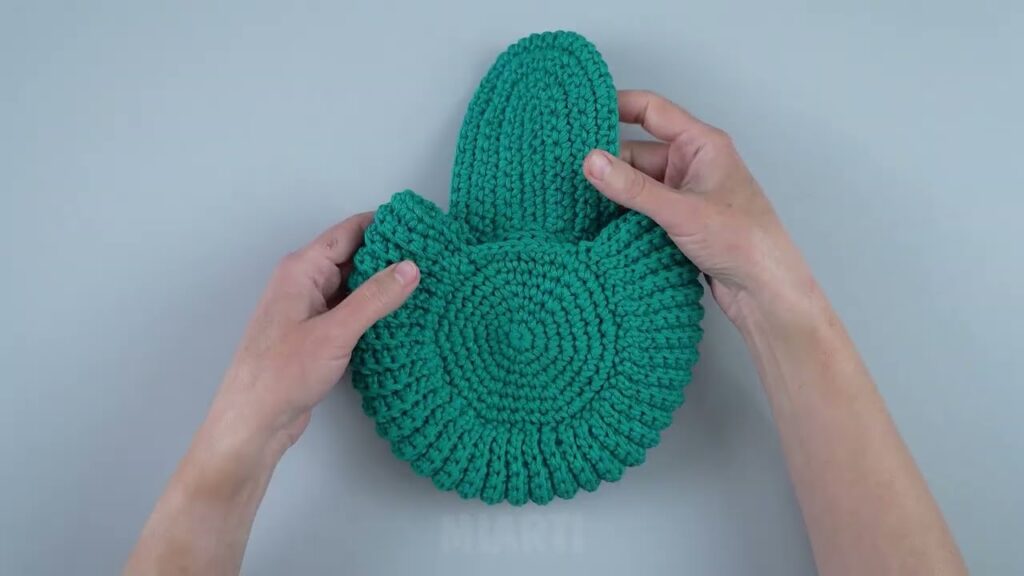
Part 4: Attaching the Strap
- Positioning: Lay your bag flat with the seams aligned. Decide where you want your strap to attach. Usually, it’s centered on the top edge of the bag, close to the side seams.
- Sewing: Using your yarn needle and the long tails, securely sew each end of the strap to the top corners of the bag opening. Go through several stitches on both the strap and the bag for a strong attachment. Reinforce by stitching back and forth a few times.
- Weave in any remaining ends.
V. Optional Enhancements
- Lining the Bag (Highly Recommended!):
- Measure the dimensions of your finished crochet bag.
- Cut two rectangular pieces of fabric for the main body, adding about 1/2 inch (1.25 cm) seam allowance on all sides.
- Cut two pieces for the sides (if your bag has depth – for this simple design, it’s just two main panels).
- Sew the fabric pieces together, leaving the top open.
- Press the top edge down about 1/2 inch and then another 1/2 inch to create a hem. Stitch this hem.
- Insert the fabric lining into your crochet bag.
- Hand-sew or machine-stitch the top edge of the lining to the top inside edge of your crochet bag.
- You can also add a small pocket to your lining before assembling it!
- Adding a Closure:
- Magnetic Snap: Sew a magnetic snap to the inside top edges of the bag.
- Button and Loop: Crochet a small chain loop on one side of the bag’s opening, and sew a decorative button on the opposite side.
- Zipper: This is a bit more advanced, but you can sew a zipper into the top opening of your lining before attaching the lining to the bag.
- Decorations:
- Add a tassel or pom-pom to the side.
- Sew on some decorative buttons or patches.
- Crochet some appliqués (flowers, stars, etc.) and sew them on.
VI. Tips for Beginners
- Don’t be afraid to make mistakes! Everyone does. Crochet is very forgiving; you can always unravel (tink or frog) your work and try again.
- Count your stitches! Especially in the beginning, counting your stitches at the end of each row will help ensure your work stays straight and doesn’t get wider or narrower.
- Watch videos! There are countless free tutorials on YouTube for basic crochet stitches. Visual learning can be incredibly helpful.
- Practice makes perfect! The more you crochet, the more comfortable and consistent your stitches will become.
- Choose a smooth, light-colored yarn for your first project. It’s easier to see your stitches with lighter colors, and smooth yarn won’t split as easily.
- Take breaks! If your hands start to cramp or you get frustrated, set your work down and come back to it later.
Crocheting a shoulder bag is a rewarding experience. Take your time, enjoy the process, and don’t hesitate to experiment with colors and textures once you’ve mastered the basics! Happy crocheting!
Watch video: