 by
by Sure, I can provide you with a detailed guide on how to make cute crochet bags for beginners. This guide will focus on ease, beauty, and simplicity.
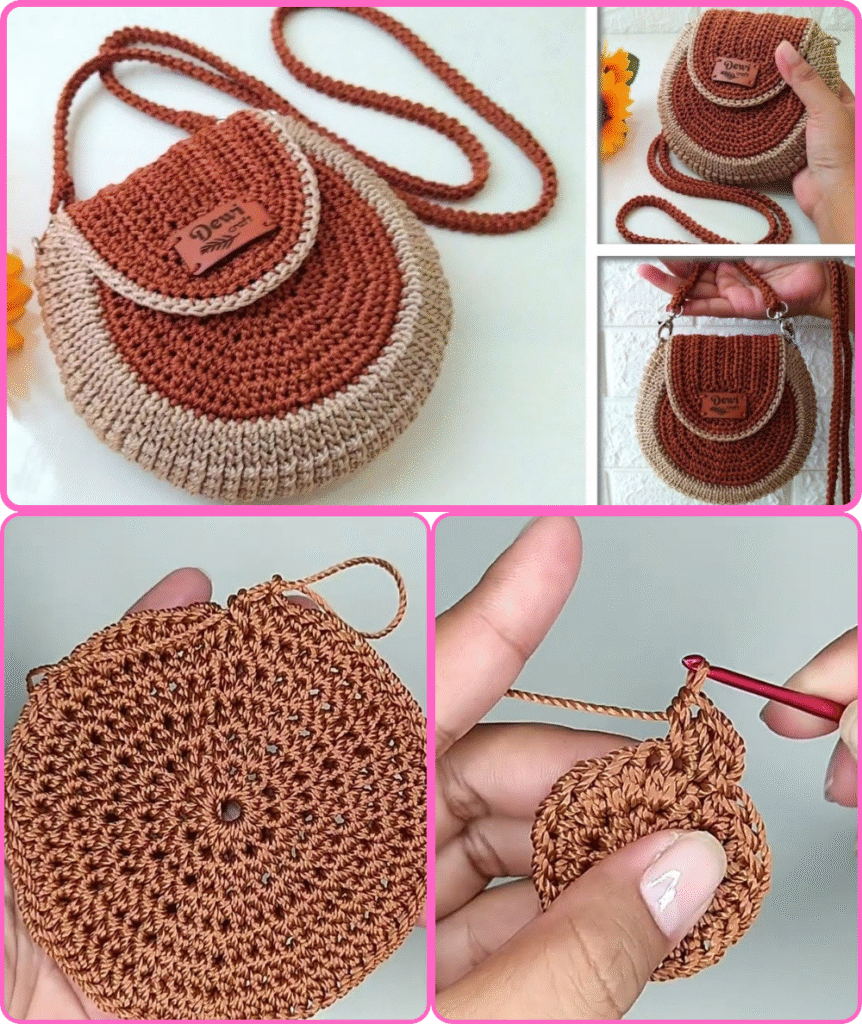
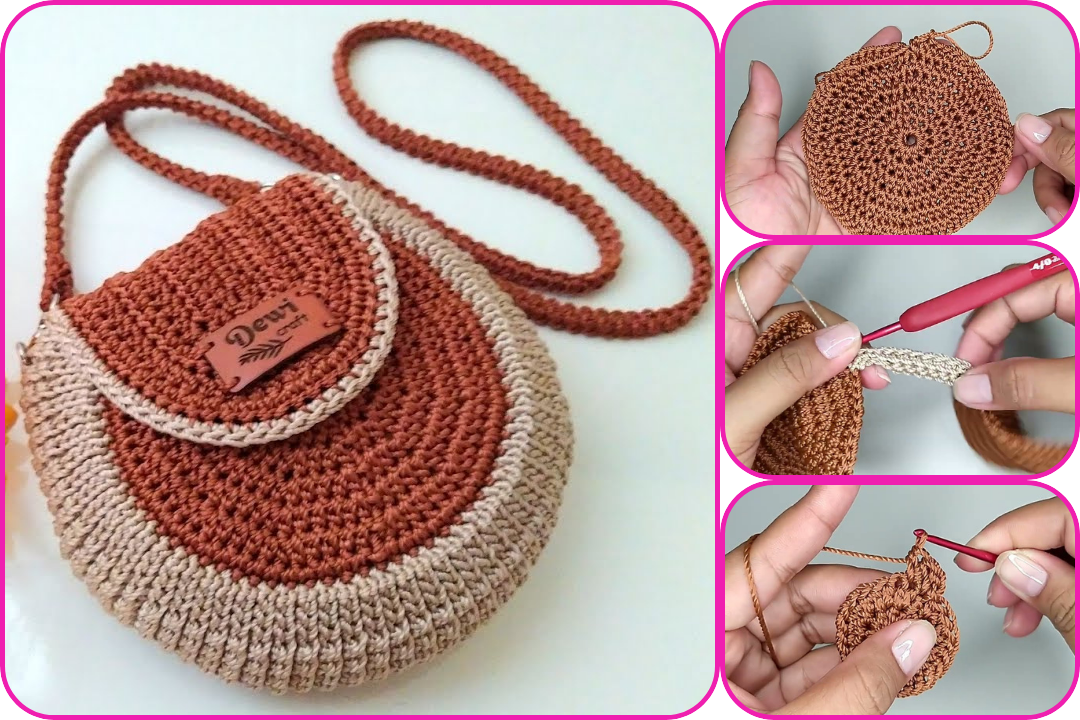
How to Make Cute Crochet Bags for Beginners: Easy, Beautiful & Simple!
Crocheting a bag is a rewarding project that allows you to create a functional and stylish accessory. For beginners, the key is to start with simple stitches and shapes. This guide will walk you through the process, from gathering your materials to finishing your first adorable crochet bag.
1. Understanding the Basics: Essential Crochet Stitches for Bags
Before we start, let’s refresh some fundamental crochet stitches that will be essential for your bag project.
- Slip Knot: The very first step to start any crochet project.
- Chain Stitch (ch): Forms the foundation row of most projects.
- Slip Stitch (sl st): Used to join stitches, move across a row without adding height, or finish off a project.
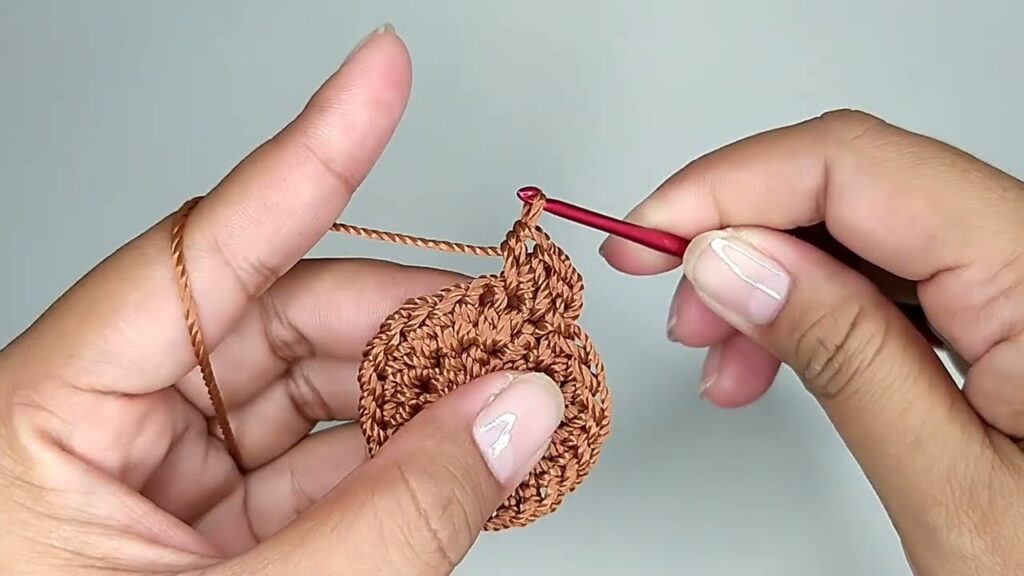
- Single Crochet (sc): A basic, dense stitch that creates a sturdy fabric, perfect for bags.
- Half Double Crochet (hdc): Slightly taller than a single crochet, offering a bit more drape while still being relatively dense.
- Double Crochet (dc): A taller stitch that creates a looser fabric with more drape. While we’ll focus on denser stitches for beginners’ bags, it’s good to know.
2. Gathering Your Materials
Having the right materials is crucial for a smooth and enjoyable crocheting experience.
- Yarn:
- Type: For beginner bags, consider worsted weight (Aran) or chunky (bulky) yarn. These are easier to work with as they show stitch definition well and your bag will grow quickly.
- Fiber:
- Acrylic: Affordable, widely available, comes in a vast array of colors, and is easy to care for.
- Cotton: Creates a sturdy, structured bag, good for market bags or totes. It has less stretch than acrylic.
- Blends: Many yarns are blends of different fibers, offering a mix of properties.
- Quantity: For a small to medium-sized bag (like a clutch or small shoulder bag), you’ll likely need 150-300 yards (approximately 100-200 grams) of yarn. Always check the yarn label for recommended hook size and yardage.
- Crochet Hook:
- Size: The yarn label will recommend a hook size. For worsted weight yarn, a 5.0mm (H/8) or 5.5mm (I/9) hook is common. For chunky yarn, you might use a 6.0mm (J/10) to 9.0mm (N/13) hook.
- Material: Aluminum, plastic, or ergonomic hooks are all fine. Choose what feels comfortable in your hand.
- Scissors: For cutting yarn.
- Yarn Needle (Tapestry Needle): A blunt-tipped needle with a large eye, used for weaving in ends and seaming pieces together.
- Stitch Markers (Optional but Recommended): Helpful for marking the beginning of a round or specific stitches, especially when working in the round.
- Measuring Tape/Ruler: To check your gauge and the dimensions of your bag.
- Bag Accessories (Optional):
- Fabric for Lining: To give your bag more structure and prevent items from falling through stitches (especially with looser stitches).
- Zipper or Magnetic Snap: For closure.
- Bag Handles/Straps: You can crochet your own or purchase ready-made ones (leather, wooden, metal).
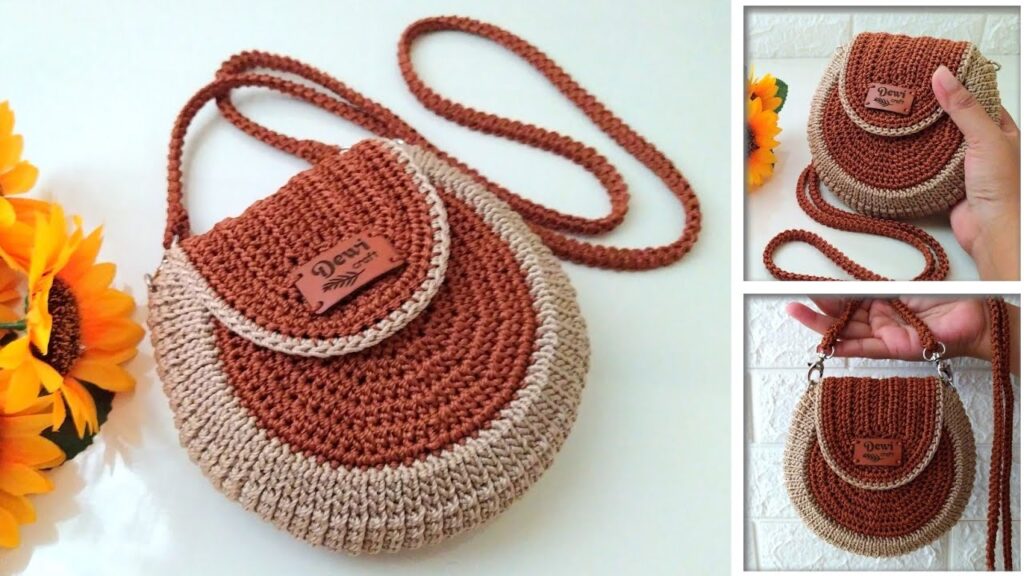
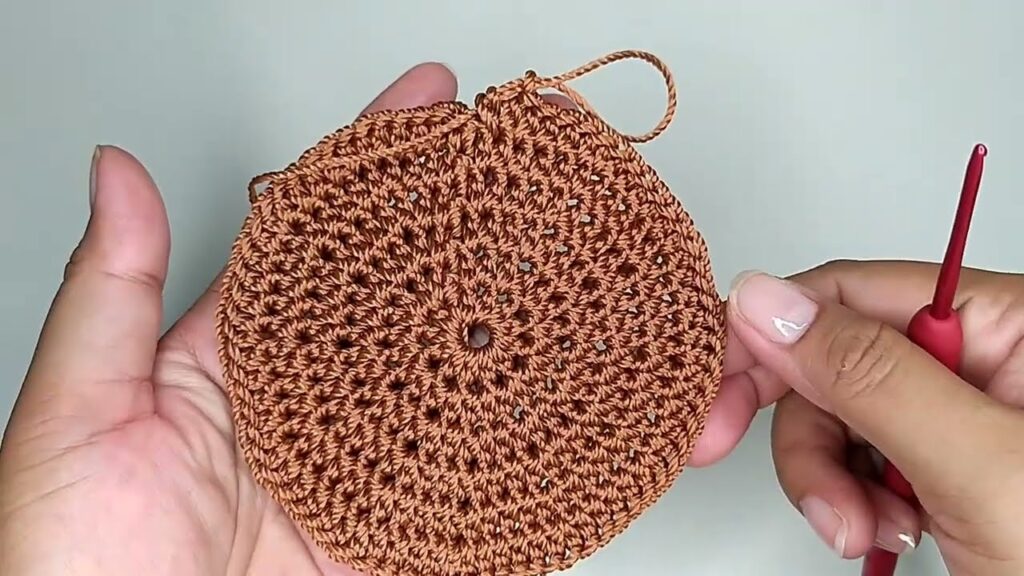
3. Choosing a Simple Bag Style for Beginners
For your first bag, stick to simple shapes that primarily involve working in rows or a simple flat base followed by rounds.
- Flat Pouch/Clutch: The simplest, essentially two rectangles sewn together or one long rectangle folded.
- Simple Tote Bag: A rectangle folded and seamed, or a flat oval base worked in rounds, then sides worked upwards.
- Market Bag (Mesh Bag): Uses larger stitches (like double crochet or chain spaces) to create a lacy effect. Might be a bit more challenging for a complete beginner but a good second project.
We will focus on a “Simple Flat Pouch/Clutch” for this guide as it’s the easiest to start with.
4. Step-by-Step Guide: Easy Flat Pouch/Clutch
This project will teach you how to create a basic rectangle, which is the foundation for many crochet projects.
Abbreviations:
- ch: chain
- sc: single crochet
- st(s): stitch(es)
- FO: finish off
Instructions:
Part 1: Making the Front/Back Panel (Make 2 identical panels)
- Create a Slip Knot and Chain:
- Make a slip knot on your hook.
- Ch 21 (this will be the width of your pouch. You can adjust this number. For a wider pouch, chain more; for a narrower one, chain less. Just remember your turning chain counts as a stitch).
- Tip: Don’t chain too tightly, or your first row will be difficult to work into.
- Row 1 (Single Crochet):
- Insert your hook into the 2nd chain from the hook.
- Work 1 sc in each chain across. (You should have 20 sc).
- Ch 1 (this is your turning chain, which doesn’t count as a stitch in sc).
- Turn your work.
- Row 2 and onwards:
- Work 1 sc in the first sc (the stitch directly below your turning chain).
- Work 1 sc in each sc across to the end of the row. (You should still have 20 sc).
- Ch 1, turn.
- Repeat Row 2 until your piece measures your desired height (e.g., 8-10 inches for a clutch).
- Aim for a consistent tension to ensure your rectangle is even.
- Finishing the Panel:
- Once your panel reaches the desired height, cut your yarn, leaving a tail of about 6-8 inches.
- Yarn over and pull the tail completely through the loop on your hook to secure (FO).
- Repeat steps 1-4 to create a second identical panel.
Part 2: Assembling the Pouch
- Align the Panels:
- Place the two crochet panels on top of each other, aligning the edges. You can choose to have the “right sides” facing each other if you want to seam from the inside, or face the right sides out if you prefer a visible seam (like a whip stitch). For beginners, aligning right sides out and using a slip stitch seam is often easiest.
- Seaming the Sides and Bottom:
- Option A: Slip Stitch Seam (Recommended for beginners):
- With your yarn needle, weave in the starting tails of both panels so they are neatly hidden.
- Take one of your remaining yarn tails (from one of the finished panels) or attach a new piece of yarn to one corner of the joined panels.
- Insert your hook through both loops of a stitch on the first panel AND both loops of the corresponding stitch on the second panel.
- Yarn over, pull through all loops to make a slip stitch.
- Continue making slip stitches through both layers along one side, then across the bottom, and up the other side. This creates a neat, flat seam.
- FO and weave in any remaining tail.
- Option B: Yarn Needle Seam (Whip Stitch or Mattress Stitch):
- Thread one of your long yarn tails onto your yarn needle.
- Whip Stitch: Insert your needle from back to front through both layers, then loop the yarn over the edge and insert back into the next stitch, repeating along the edge. This creates a slightly raised, decorative seam.
- Mattress Stitch: This creates an invisible seam, but can be a bit trickier for beginners. It involves working into the horizontal bars between stitches on each panel.
- Repeat for all three sides (two long sides and the bottom).
- Option A: Slip Stitch Seam (Recommended for beginners):
Part 3: Adding a Closure (Optional but Recommended)
- Zipper:
- This requires basic sewing skills. Hand-sew a zipper along the top opening of your pouch using a sewing needle and thread that matches your yarn or zipper.
- Tip: Use pins to hold the zipper in place before sewing.
- Magnetic Snap:
- These are usually sewn in place with a sewing needle and thread, or they might have prongs that push through the fabric and bend to secure. Position them in the center of the top opening.
- Button and Loop:
- Crochet a small chain loop on one side of the opening.
- Sew a decorative button to the opposite side, ensuring it fits through the loop.
Part 4: Adding a Strap/Handle (Optional)
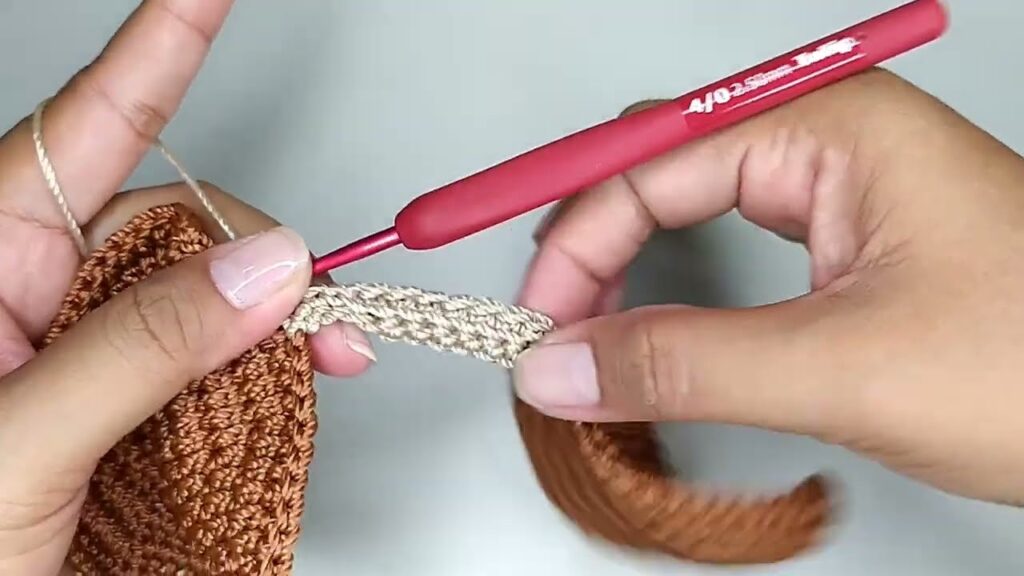
- Crochet Strap (Simple Chain/Slip Stitch Strap):
- Decide on your desired strap length.
- Make a long chain (e.g., 60-100 chains for a shoulder strap).
- Sl st in the 2nd ch from hook and in each ch across. This creates a flat, sturdy strap.
- Sew the ends of the strap securely to the top corners of your pouch using your yarn needle.
- Purchased Strap:
- Attach the strap using the hardware provided (D-rings, clasps, etc.) or sew it directly onto the bag.
5. Tips for Success and Beautiful Results
- Practice Your Stitches: Before starting, practice your single crochet (or chosen stitch) until you feel comfortable and your tension is consistent.
- Count Your Stitches: Especially in the beginning, count your stitches at the end of each row to ensure your sides remain straight and you don’t accidentally add or lose stitches. Stitch markers can be very helpful here.
- Read the Entire Pattern First: Get a good overview of the project before you start crocheting.
- Don’t Be Afraid to Undo (Frog It!): If you make a mistake, it’s always better to undo a few rows than to continue with an error. “Frogging” (ripping out stitches) is a normal part of crocheting.
- Weave in Ends Neatly: Loose ends can unravel your project. Take your time to weave them in securely using a yarn needle, going in different directions.
- Block Your Finished Project (Optional but Recommended): Blocking helps to even out your stitches, shape your bag, and make it look more professional. You can wet block (spritz with water, shape, and let dry) or steam block (use steam from an iron, don’t touch the iron directly to the yarn).
- Watch Tutorials: If you’re struggling with a stitch or technique, there are countless free video tutorials available online (YouTube is a great resource).
6. Expanding Your Skills: Ideas for Your Next Bag
Once you’ve mastered the basic pouch, you can try:
- Different Stitch Patterns: Experiment with half double crochet, double crochet, or even textured stitches like the moss stitch or basketweave stitch.
- Changing Colors: Incorporate stripes or color blocks.
- Working in the Round: Learn how to create a flat circular or oval base, then build the sides upwards. This eliminates the need for side seams.
- Adding Embellishments: Tassels, pompoms, appliques, or embroidery can add a personal touch.
- Lining Your Bag: Adding a fabric lining will make your bag more durable and functional.
With patience and practice, you’ll be making beautiful and functional crochet bags in no time! Enjoy the process!
Watch video: