 by
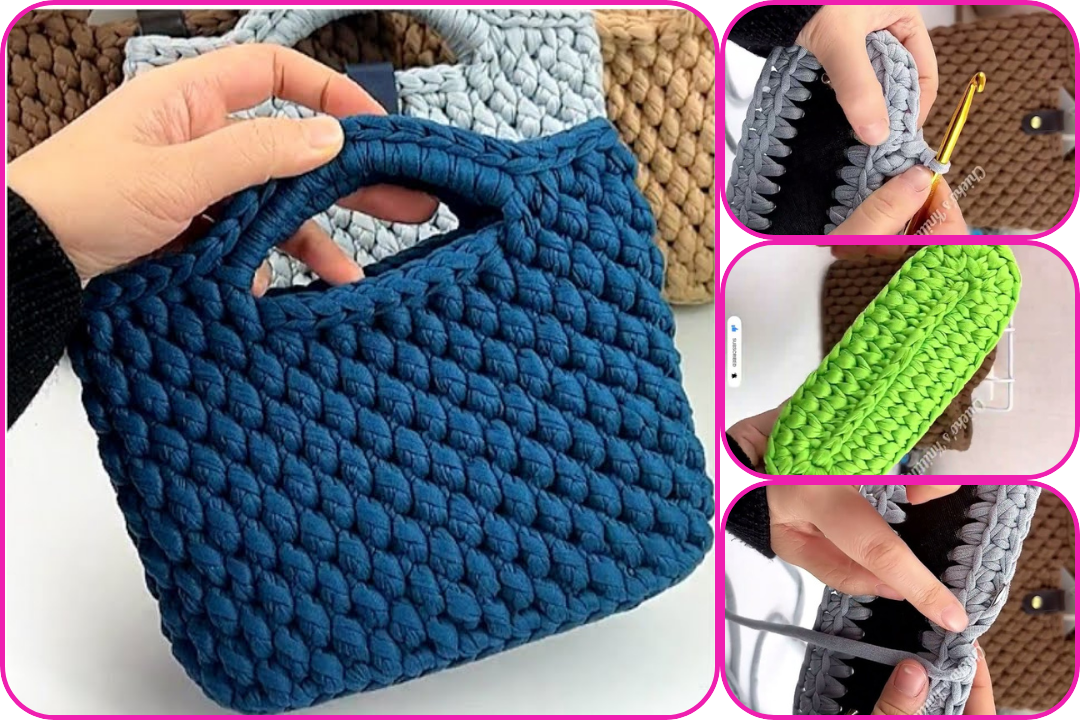
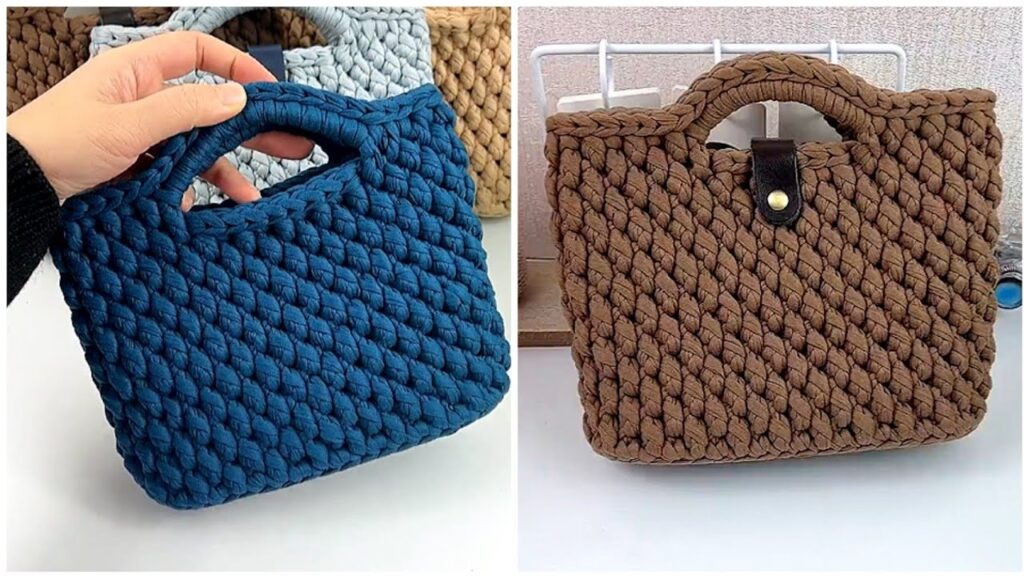
by Here’s a detailed guide on how to create an elegant yet simple crochet handbag. This design focuses on ease of creation while delivering a stylish result, perfect for those new to bag making or looking for a quick, satisfying project.
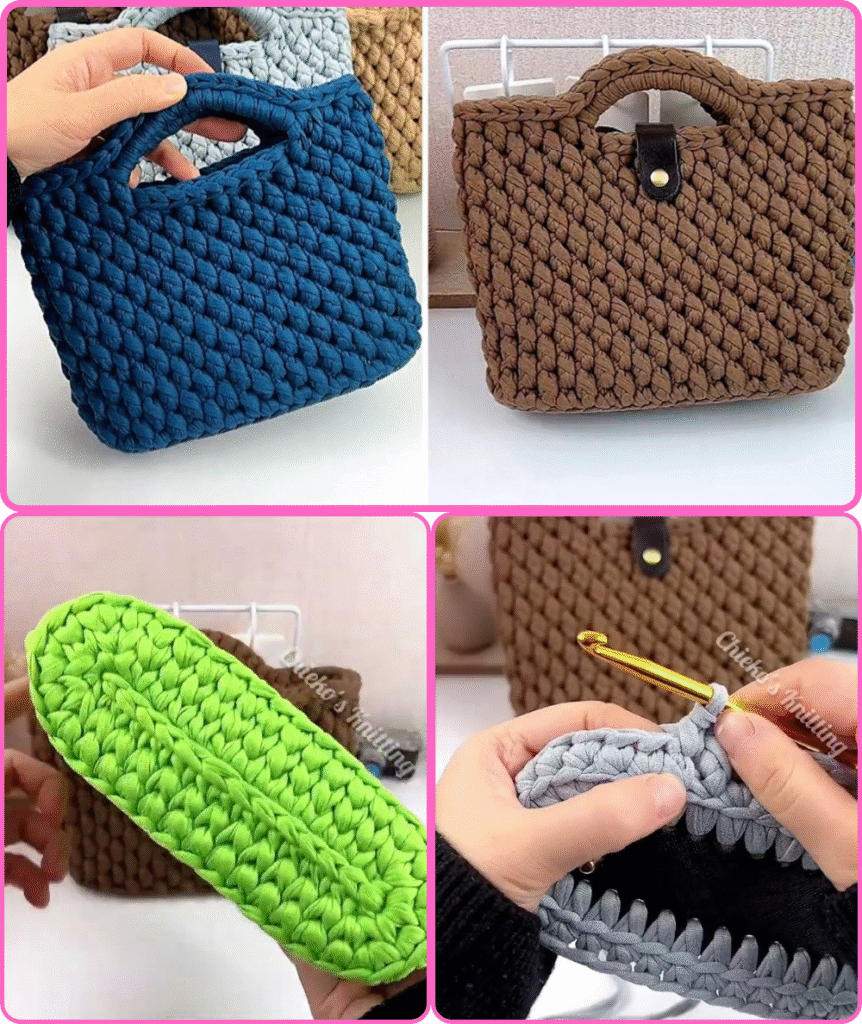
How to Make an Easy, Elegant Crochet Handbag
This project emphasizes clean lines and a structured look, making it a versatile accessory for various occasions. We’ll primarily use single crochet (sc) and half double crochet (hdc) stitches to create a dense fabric that holds its shape well.
1. Gather Your Materials
Having all your supplies ready before you begin will ensure a smooth crocheting experience.
- Yarn:
- Type: Worsted weight (Aran) or chunky (bulky) yarn is ideal for this project. These weights work up quickly and provide the necessary body for a handbag.
- Fiber: Cotton or a cotton blend offers good stitch definition and structure, which is great for bags. Acrylic is also a good, budget-friendly option with a wide color range. For a truly elegant look, consider a yarn with a subtle sheen or a tweed effect.
- Quantity: You’ll likely need 300-500 yards (200-300 grams), depending on the desired size of your handbag. Always check the yarn label for exact yardage.
- Crochet Hook:
- Size: Refer to your yarn label for the recommended hook size. For worsted weight yarn, a 5.0mm (H/8) or 5.5mm (I/9) hook is common. For chunky yarn, you might use a 6.0mm (J/10) to 8.0mm (L/11) hook. Choosing a hook size slightly smaller than recommended can result in a firmer fabric, which is desirable for bags.
- Scissors: For cutting yarn.
- Yarn Needle (Tapestry Needle): A must-have for weaving in ends and seaming.
- Stitch Markers (Optional but Recommended): Very helpful for marking the beginning of rounds or specific stitches, ensuring accuracy.
- Measuring Tape/Ruler: To check your dimensions and gauge.
- Bag Accessories (Optional, for an elegant finish):
- Fabric for Lining: Highly recommended for durability, structure, and to prevent items from slipping through stitches. Choose a sturdy fabric like cotton or canvas.
- Magnetic Snap or Zipper: For a secure closure.
- D-rings or Rectangle Rings: For attaching a strap.
- Metal or Leather Bag Handles/Strap: These instantly elevate the look of a handmade bag. Alternatively, you can crochet a matching strap.
2. Understanding Key Stitches
This handbag relies on fundamental crochet stitches that create a solid, stable fabric.
- Chain Stitch (ch): The foundation of most crochet projects.
- Slip Stitch (sl st): Used for joining rounds or creating neat seams.
- Single Crochet (sc): A dense stitch that produces a firm fabric, ideal for the base and sides of a bag.
- Half Double Crochet (hdc): Slightly taller than a single crochet, offering a bit more flexibility while still providing good structure.
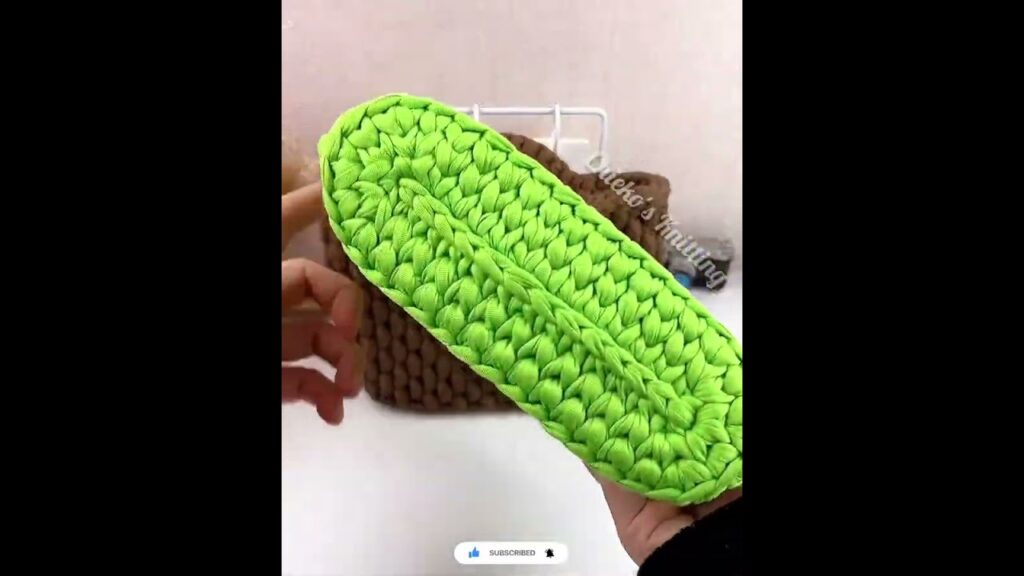
3. Handbag Design: The Flat Oval Base with Structured Sides
This design is popular for its simplicity and elegant outcome. You’ll create a flat oval for the bottom, then work up the sides in rounds.
Abbreviations:
- ch: chain
- sc: single crochet
- hdc: half double crochet
- st(s): stitch(es)
- sl st: slip stitch
- inc: increase (work 2 stitches into the same stitch)
- FO: fasten off
Gauge (Important for bag sizing!): Make a small swatch (e.g., 4″ x 4″) using your chosen yarn and hook. For sc, you might aim for 12-14 sc and 14-16 rows per 4 inches. Adjust your hook size until you achieve a fabric you like – dense, but not stiff.
Instructions:
Part 1: Creating the Oval Base
The base is worked in rows around a starting chain to form an oval. This eliminates side seams for a cleaner look.
- Starting Chain: Ch 26 (This will be the approximate length of your bag. Adjust this number for a longer or shorter bag. Keep it an even number for symmetry if you plan to work an increase on both ends).
- Round 1 (Work along the chain):
- First Side: 2 sc in the 2nd ch from hook (this is your first increase). Sc in the next 23 ch.
- End Curve: Work 4 sc in the last chain (this forms the curve at one end).
- Second Side (working back along the other side of the chain): Sc in the next 23 ch.
- Last Curve: 2 sc in the very last chain (the same chain as your first increase).
- Sl st to the first sc to join the round. (You should have 54 sc).
- Tip: Use a stitch marker in the first stitch of each round to help keep track.
- Round 2 (Shaping the Oval):
- Ch 1 (does not count as a stitch).
- 2 sc in the first sc (inc).
- 1 sc in the next 25 sts.
- 2 sc in each of the next 2 sts (2 increases on the curve).
- 1 sc in the next 25 sts.
- 2 sc in the last st (inc).
- Sl st to the first sc to join. (You should have 60 sc).
- Round 3 (Optional for a wider base):
- Ch 1.
- Sc in the first st. 2 sc in the next st (inc).
- 1 sc in the next 26 sts.
- (Sc in next st, 2 sc in next st) twice.
- 1 sc in the next 26 sts.
- Sc in the last st. 2 sc in the very last st.
- Sl st to the first sc to join. (You should have 66 sc).
- You can add more increase rounds if you want a wider base, but for an elegant, compact bag, 2-3 increase rounds are usually sufficient.
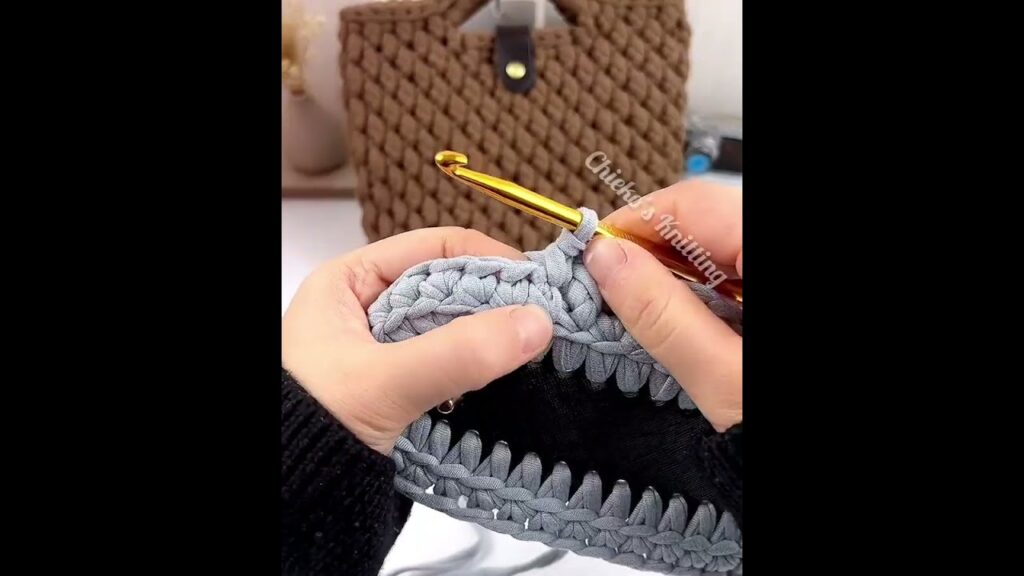
Part 2: Working the Sides of the Handbag
This section uses half double crochet (hdc) for a slightly softer drape than sc, but still maintains good structure.
- Round 1 (Establishing Sides – HDC into Back Loop Only):
- Ch 1 (does not count as a stitch).
- Work 1 hdc in the back loop only (BLO) of each stitch around. This creates a defined edge between the base and the sides and helps the bag stand upright.
- Sl st to the first hdc to join. (You should have the same stitch count as your last base round, e.g., 66 hdc).
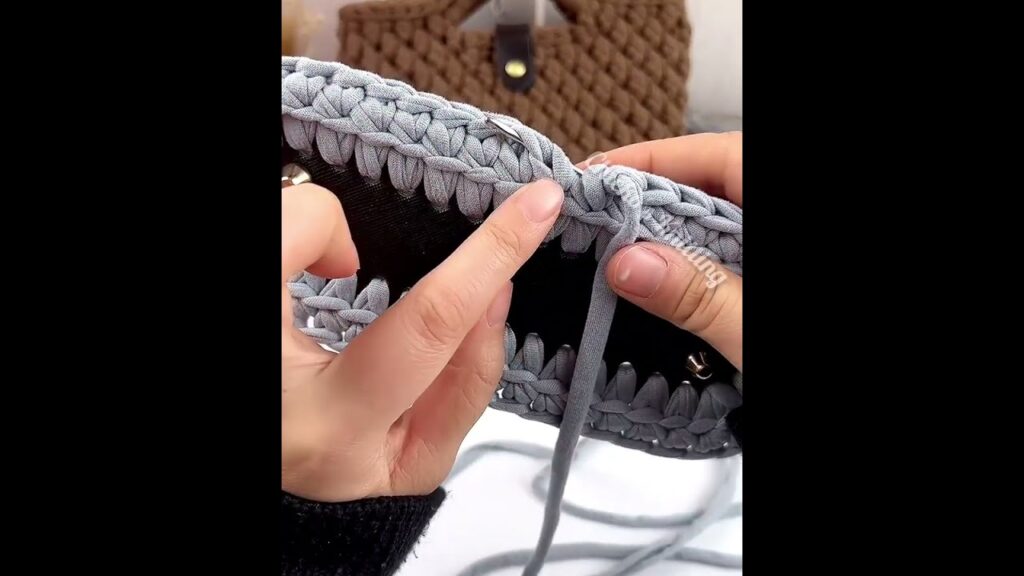
- Round 2 and onwards (HDC in both loops):
- Ch 1.
- Work 1 hdc in both loops of each stitch around.
- Sl st to the first hdc to join.
- Repeat this round until your bag reaches your desired height (e.g., 8-10 inches). For a structured look, a medium height often works best.
- Keep your tension consistent for straight sides.
Part 3: Shaping the Top Edge (Optional but Recommended)
This adds a polished finish to the top of the bag.
- Final Round (Single Crochet):
- Ch 1.
- Work 1 sc in each stitch around. This tightens the top edge slightly.
- Sl st to the first sc to join.
- FO, leaving a tail for weaving in.
4. Finishing and Assembling Your Handbag
This is where your elegant handbag truly comes to life!
- Weave in Ends: Use your yarn needle to carefully weave in all loose ends. Go in different directions to secure them completely and make them invisible.
- Blocking (Highly Recommended):
- Blocking is crucial for shaping your bag and evening out stitches, giving it a professional finish.
- Wet Blocking: Gently dampen the entire bag (you can immerse it briefly in lukewarm water and squeeze out excess, or spritz with water). Lay it flat on a towel, gently shape it to your desired dimensions, and let it air dry completely. You can stuff it lightly with tissue paper or a clean towel to help maintain its shape while drying.
- Steam Blocking: Use a garment steamer or the steam function on an iron (do not touch the iron directly to the crochet fabric!) to apply steam to the bag, then gently shape it with your hands and let it cool and dry.
- Adding a Lining (Recommended for Elegance and Durability):
- A fabric lining gives your bag a professional look, adds structure, and prevents small items from slipping through stitches.
- Measure the inside dimensions of your crocheted bag.
- Cut two pieces of lining fabric for the main body (matching the height and half the circumference plus seam allowance) and one piece for the bottom oval (matching the base shape plus seam allowance).
- Sew the fabric pieces together by machine or hand to create a fabric “bag” that fits snugly inside your crochet bag.
- Fold over the top edge of the fabric lining, press it, and hand-sew it neatly to the inside top edge of your crocheted bag using a sewing needle and matching thread.
- Attaching a Closure:
- Magnetic Snap: Hand-sew a sew-in magnetic snap just below the top edge on the inside of the bag. One part on the front side, the other on the back side, ensuring they align.
- Zipper: For a more advanced finish, measure a zipper that fits the top opening. You can hand-sew the zipper to the top edge of your crocheted bag (and lining, if applicable) using a regular sewing needle and strong thread.
- Adding Handles/Strap:
- Purchased Handles: If using metal, bamboo, or leather handles, attach them according to their specific hardware. You might sew them directly onto the top edge, or attach D-rings to the bag first and then clip the handles onto the D-rings.
- To attach D-rings: Crochet small tabs (e.g., sc 5, then sc in each st for 2-3 rows) and sew them securely to the inside top corners of your bag, threading the D-ring onto the tab before sewing.
- Crocheted Strap:
- Simple Strap: Chain your desired strap length (e.g., 40-50 inches for a shoulder strap). Work back down the chain in sc or hdc for 2-3 rows to create a sturdy strap. FO.
- Attaching Strap: Sew the ends of your crocheted strap securely to the inside top corners of your bag, or attach them to D-rings if you’ve added them.
- Purchased Handles: If using metal, bamboo, or leather handles, attach them according to their specific hardware. You might sew them directly onto the top edge, or attach D-rings to the bag first and then clip the handles onto the D-rings.
6. Tips for a Simple and Wonderful Result
- Choose Your Yarn Wisely: The yarn choice significantly impacts the final look. A structured fiber like cotton and a solid color or subtle tweed will lend an elegant feel.
- Maintain Consistent Tension: This is the most important factor for an even and professional-looking bag.
- Don’t Skip Blocking: It truly transforms the finished piece, making it lie flat and shaping it perfectly.
- Consider Bag Feet: For extra protection and elegance, you can sew small metal bag feet to the bottom of your bag.
- Practice Makes Perfect: If this is your first bag, don’t worry about perfection. Each project helps you learn and improve!
By following these steps, you can create a beautiful, elegant, and functional crochet handbag that you’ll be proud to carry or give as a gift!
Watch video: