by
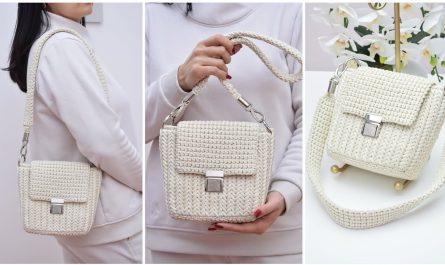
by Crocheting a summer backpack with cord is a rewarding and functional project. Cord (such as cotton macrame cord or polyester craft cord) is sturdy and ideal for bags that need structure and durability. Here’s a detailed, step-by-step guide for crocheting your own summer backpack using cord.

🧶 How to Crochet a Summer Backpack Using Cord
Skill Level: Intermediate
Estimated Time: 6–10 hours
Finished Size: Approx. 12″ (height) x 10″ (width) x 4″ (depth)
Crochet Terms: US terminology
✨ Materials Needed:
| Item | Description |
|---|---|
| Crochet Cord | 3-4 mm thickness, approx. 150–200 yards (cotton/polyester cord) |
| Crochet Hook | 6.0 mm or size suitable for your cord |
| Stitch Marker | Optional but helpful |
| Scissors | For trimming ends |
| Yarn Needle | For sewing in ends |
| Magnetic Snap | For closure (or button) |
| Optional: Lining Fabric | For a neat interior finish |
| D-Rings & Adjustable Strap | For a polished, functional look |

🧵 Step-by-Step Instructions
🧱 Part 1: Crochet the Base
1. Start with a chain foundation:
- Ch 21 (for a base of approx. 10″ wide).
2. Round 1:
- Sc in 2nd ch from hook and each ch across (20 sc).
- Turn your work, sc into the bottom of each ch across the other side (20 sc).
- You now have an oval base. Place a stitch marker at the start of the round.
3. Round 2–5:
- Sc in each stitch around to continue building up the base oval.
- Optional: Increase at the ends by placing 2 sc in the 1st and last stitches on each side (to widen the base).
➡️ By Round 5, you should have a sturdy, slightly rounded rectangle base.

🧺 Part 2: Build the Body
4. Round 6–25:
- Work in continuous rounds (no joining): sc in each stitch around.
- The body will begin to grow upwards, forming a cylinder.
Optional Design Touches:
- Change stitch pattern for texture. Try:
- Hdc (half double crochet) for speed
- Back loop only (blo) sc for a ribbed look
- Add stripes by changing color
➡️ Stop when the bag measures around 11–12 inches in height.
🎒 Part 3: Create the Drawstring Top
5. Round 26–28:
- Create eyelets for drawstring:
- (Ch 1, skip 1 stitch, sc in next) repeat around
- Next round: sc in each stitch and ch-space.
This creates a row of holes for weaving the drawstring later.
🔄 Part 4: Make the Flap
6. Attach yarn to the back side (center) of the top edge.
Row 1: Ch 1, sc in next 12 stitches
Row 2–10: Turn, sc across (12 sc).
Row 11–15: Begin tapering:
- Row 11: sc2tog, sc 8, sc2tog
- Row 12: sc2tog, sc 6, sc2tog
- Continue until 4–5 stitches remain.
Optional: Add a buttonhole:
- In last row: sc2, ch 1, skip 1, sc1.
Fasten off and weave in ends.

🪢 Part 5: Make the Straps
7. For 2 Shoulder Straps:
- Ch 80–90 (or to desired length).
- Sc in each ch back across. Fasten off.
8. Attach Straps:
- Sew ends of straps to bottom corners of the bag and top sides (just under the flap) using yarn needle.
Optional: Use D-rings or adjustable strap buckles for a more polished, adjustable fit.
🎀 Part 6: Add the Drawstring
9. Make the drawstring:
- Ch 90–100 (or desired length), sc in each ch back across.
- Weave through the eyelets made in Rounds 26–28.
Tip: Add tassels, beads, or a knot at the end for style.
✂️ Part 7: Finishing Touches
10. Closure:
- Attach a magnetic snap or sew on a button under the flap.
11. Optional: Add Lining
- Cut fabric slightly larger than the bag’s shape.
- Hand-sew or hot-glue inside the bag.
- Make sure holes for drawstring align.
12. Weave in all ends and trim excess.
✅ Final Tips:
- Use a stitch marker to mark the beginning of rounds.
- Keep your tension tight to give the bag structure.
- If using synthetic cord, lightly melt ends with a lighter to prevent fraying (with caution).
- Customize with color-blocking, embroidery, or patches.
Watch tutorial: