 by
by Here’s a clear, beginner-friendly, step-by-step tutorial you can use as a blog post, video script, or learning guide.
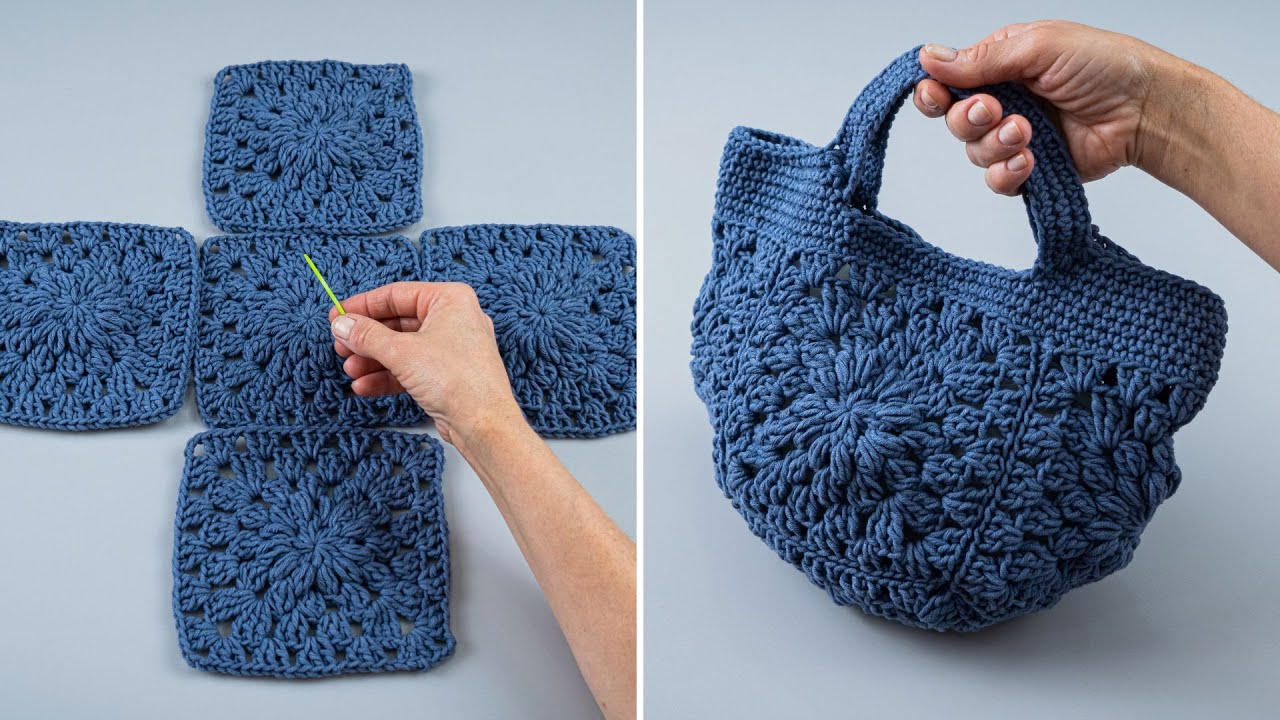
How to Make an Easy Crochet Bag – Tutorial for Beginners
Crocheting your own bag is a fun and practical project, especially if you’re new to crochet. This easy crochet bag tutorial uses basic stitches, simple shaping, and minimal counting—perfect for beginners. By the end, you’ll have a handmade bag you can use every day!
🧶 Materials You’ll Need
- Yarn: Medium weight (Category 4 / worsted weight) cotton or acrylic yarn
(Cotton is best for bags because it’s strong and doesn’t stretch much.) - Crochet Hook: 5.0 mm (H/8) or size recommended on your yarn label
- Scissors
- Yarn Needle (for weaving in ends)
- Stitch Marker (optional but helpful)
📘 Crochet Abbreviations (US Terms)
- ch – chain
- sc – single crochet
- sl st – slip stitch
- st(s) – stitch(es)
- rep – repeat
✨ This tutorial uses only chain and single crochet stitches—great for beginners!
📏 Finished Size (Approximate)
- Width: 10–12 inches
- Height: 10 inches
- Handle: 18–22 inches (adjustable)
🪢 Step 1: Make the Base of the Bag
- Chain 31 (this determines the width of your bag)
- Row 1:
- Insert hook into the 2nd chain from the hook
- Single crochet across
- You should have 30 sc
- Chain 1, turn
- Rows 2–10:
- Single crochet in every stitch
- Chain 1 and turn at the end of each row
👉 This creates a solid rectangular base.
🧵 Step 2: Crochet the Body of the Bag
Now we’ll work around the base instead of back and forth.
- Do not turn your work
- Single crochet evenly around all sides of the rectangle
- Place 1–2 extra stitches in each corner to prevent curling
- Join with a slip stitch to the first stitch
Continue Building the Bag:
- Round 2–20:
- Single crochet in each stitch around
- Join each round with a slip stitch
👜 Keep crocheting until your bag reaches your desired height.
✋ Step 3: Create the Bag Handles
- Crochet until you reach the side where you want the handle
- Chain 30 (for a shoulder strap; chain fewer for a short handle)
- Skip 15 stitches
- Single crochet into the next stitch
- Continue single crocheting around
- Repeat for the second handle on the opposite side
Next Round:
- Single crochet around, placing stitches into the chains to strengthen the handles
🧶 Step 4: Finish the Bag
- Slip stitch to close the final round
- Cut yarn, leaving a 5–6 inch tail
- Pull through and tighten
- Use a yarn needle to weave in all loose ends
🌸 Optional Customizations
- Add a button or zipper
- Crochet a flower or bow
- Use two colors for stripes
- Line the bag with fabric for extra durability
🎉 Final Tips for Beginners
- Keep your stitches relaxed—not too tight
- Count stitches occasionally to stay consistent
- Practice makes progress, not perfection!
If you’d like, I can also:
- Write this as a YouTube video script
- Create a short version for social media
- Add photos or stitch diagrams
- Adjust the pattern for kids, market bags, or tote bags
Watch tutorial: